

How to Safely Configure Your Router Like a Pro
Getting access to the router’s configuration application
Your router’s configuration is contained within a website which sits on the router itself. In order to configure a router, we first need to find that website, and then we need to log into it.
Finding your router’s configuration application
In order to change the router’s configuration, we need to point our browser at the router. To do this, we enter the router’s network address (or IP address) as if it were a website.
This is commonly 192.168.0.1 or 192.168.1.1 but may be different for your model. If you’ve still got the manual, the actual address will be in there somewhere. If you can't find the manual, a search for the make and model usually surfaces a copy of the manual.
Router manufacturers have started printing the configuration application’s address on the router itself. And they’ve also started giving them proper readable website addresses.

Check your router to see if the address of the configuration application is written on the router. In this example, we can see that the router’s configuration application is at the URL http://www.routerlogin.net. This address just takes us to 192.168.0.1, but with a bit more typing.
Logging into the configuration application

The first thing that we will see when we attempt to log into the router is a prompt for a User name and Password. These should be printed on the side of the router, but if not the user name is usually 'admin' and the password is usually either 'admin' or 'password'. If neither of these work, then it's back to the manual again. If you have changed and forgotten the router's password, then there is usually a reset 'button' somewhere on the unit. If you have a paperclip handy, then you'll be able to reset the unit to factor settings, and the default credentials will let you into the configuration application.
Once you’ve found and entered the right user name and password, you’ll be in your router’s configuration application. This is where the magic happens.
Security Options configuration walk-through – Netgear
OK. Let’s walk through a couple of examples of the types of things you’re likely to be confronted by when you step into the router’s configuration interface. Let’s take a look at an example of a Netgear router and a D-Link router.
By way of an example, here are the four available security options for one of Netgear’s units.

The list below shows which option we need to select, with a short explanation as to why:
NONE
We are not going to select this because ‘None’ is to be AVOIDED. For 'None' read 'Hackers Welcome'
WPA-PSK [TKIP]
We are not going to select this because ‘WPA’ and ‘TKIP’ are to be AVOIDED.
WPA2-PSK [AES]
We are going to select this because 'WPA2' and 'AES' and 'PSK' are all GOOD.
WPA-PSK [TKIP] + WPA2-PSK [AES]
We are not going to select this because ‘WPA’ and ‘TKIP’ are to be AVOIDED. Plus, this is in fact a ‘Mixed’ option and another reason to AVOID the option.
In this example, there is only one possible secure option that we can select - WPA2-PSK [AES]. The other three options are insecure.
What’s the difference between Personal and Enterprise?
A: Some routers give the option of picking WPA2-Personal or WPA2-Enterprise. The Enterprise option is for business, the Personal option is for you. You won’t be able to use the Enterprise option in a home environment. This fact does not impact your security.
What do I do if I can’t avoid some of the AVOID options?
A: If your router won’t allow you to select exclusively GOOD technoglyphs in the configuration, then your choice is simple – accept the fact that your wireless network is insecure (i.e. vulnerable to breach) or buy a new router that supports WPA2 and AES.
Security Options configuration walk-through – D-Link
Let’s also look at another router configuration example, and again walk through the network security settings and the logic that we used to come to our final configuration.
Here is part of the Wireless configuration screen for the D-Link 601 router.

We can see that there is a Security Mode setting, a WPA Mode setting and a Cipher Type setting – all displaying now familiar router technoglyphs. So our initial guess is that we are going to need to dip into each of these to get the right security settings. And we're also seeing a reference to TKIP (which is on the AVOID list), so we know that we've got work to do.
SECURITY MODE
Let’s start by fishing around in the Security Mode settings (the top-most option in the diagram above).
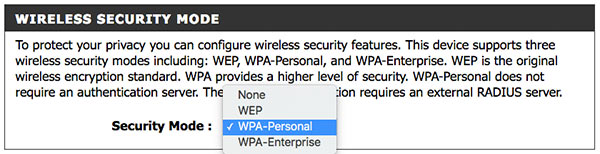
At first glance, none of these look acceptable. The first two ('None' & 'WEP') are on the AVOID list. ‘Personal’ is GOOD but ‘WPA’ is to be AVOIDED. And finally ‘Enterprise’ is also on the AVOID list. So the third option ‘WPA-Personal’ looks the least worst. Let’s select that and keep fishing. There are more options to play with.
WPA MODE
The second configuration option in the D-Link interface 'WPA Mode' allows us to be more specific about our choice of 'WPA'.

Here, we can specify the WPA mode. This is a slight abuse of the facts, but never mind, let's press on. The first option is ‘Auto’ which is to be AVOIDED. As is the third option ‘WPA Only’. But ‘WPA2 Only’ is GOOD. Bingo.
Just one option left to configure.
CIPHER TYPE
Here we have 3 choices.

‘TKIP’ is be AVOIDED, so no to that one. 'TKIP and AES' is close, but no cigar. But the second option 'AES' is very much on the GOOD list, so we are done. The second option on the list 'AES' it is.
Our final configuration on this particular router looks like this:

So while there are a lot of pointless and off-putting words on the screen, and a millions ways to go wrong, we just muddled our way through each and every option, and by a process of elimination, arrived at a secure configuration. We just kept as close as we could to GOOD and we got there.
RECAPPING ON THE PROCESS
Step 1 – Log onto your router’s configuration interface
Step 2 – Find the wireless settings menu option and select it
Step 3 – Locate the security settings
Step 4 – Ensure that they are set to GOOD options only
Step 5 – Save
Unless your using D-Link or Netgear routers, chances are that your router’s wireless settings screen won’t look anything like either of these examples. Just looking at these two models, we can see immediately just how different they can be. But not to worry - the same process applies. If you avoid the AVOID options and stick with the GOOD ones, then you’re going to get there. And if any of the AVOID options are unavoidable (e.g. there is no option for WPA2), then you’re going to the store to buy a new wireless router.
Next up - Disabling Wi-fi Protected Setup
Images sourced from http://support.dlink.com/emulators/dir601/100NA/wireless.html